Building and destroying projects with Terraform

While creating lessons and tutorials on Popularowl in most cases, as a prerequisite, we need to start one or more virtual servers and pre-install them with necesary tools and applications.
After we finished using these virtual machines, we want to be able to destroy this virtual infrastructure. And quickly recreate it next time we need the setup.
This saves us time and we only pay for usage when our VM instances are active.
In this tutorial we have step by step guide how to use Infrastructure as a code approach and Terraform to provision a new virtual servers for training projects.
What will we build?

In this tutorial, we will build the basic Terraform project for automating the provisioning and setup of the cloud virtual machine.
This Terraform project is widely referenced and used across multiple tutorials and courses here on Popularowl as a foundation project.
By the end of this tutorial, you will have a set of files and scripts which allow you to rapidly create and destroy Linux based virtual servers on Digital Ocean cloud.
Prerequisites
- Access to Digital Ocean. In this tutorial we are using this cloud - they have generous free credits available.
- Infrastructure as code tool Terraform installed on your local machine.
1. Using Terraform
All popular public cloud providers allow to create / destroy virtual servers and other cloud products.
You can achieve this via provided user interfaces or programmatically via cloud platform APIs.
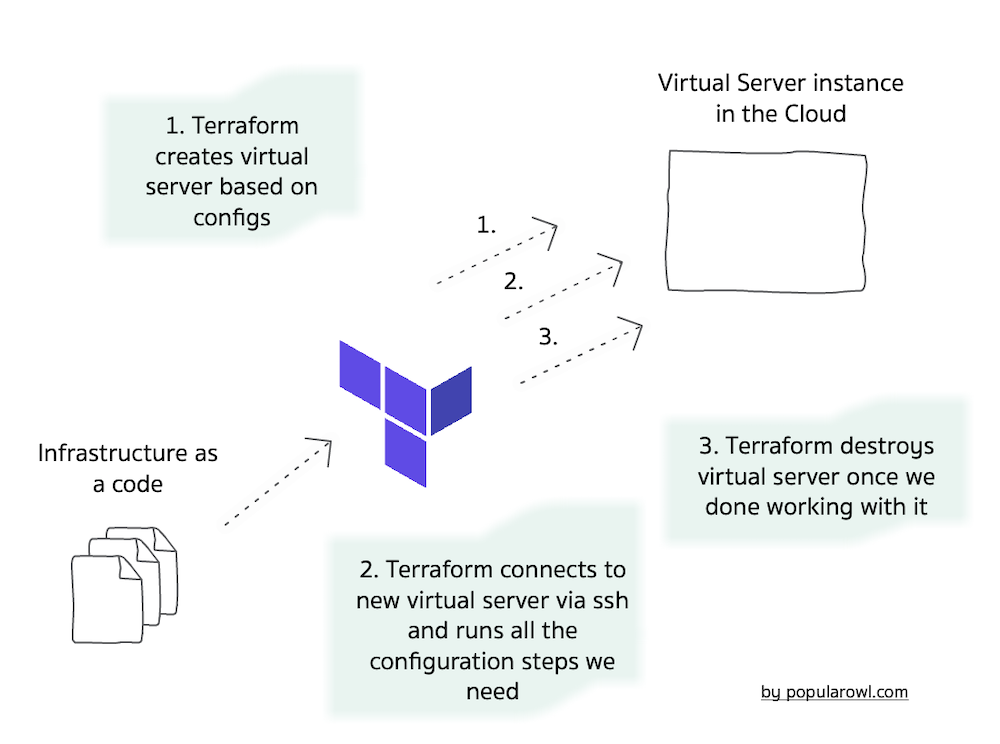
Tools like Terraform, aim to simplify and automate such interactions with the cloud platform APIs.
Terraform allows us to keep the set of instructions as configuration files and automates the rest.
It supports multiple public cloud providers like AWS, Google Cloud, Azure, Digital Ocean etc.
Exactly what we need in our case.
Note: We recomend you to install Tfenv utility which allows to install and quickly switch between multiple Terraform versions on development mashines. In this tutorial we use Terraform version 1.1.5
2. Versions file
First, create a Terraform file called versions.tf. This file will describe the minimal Terraform version required and also the required version for Digita Ocean provider.
terraform {
  required_version = ">= 1.1.5"

  required_providers {
    digitalocean = {
      source = "digitalocean/digitalocean"
      version = "~> 2.0"
    }
  }
}
3. Variables file
Next, create a Terraform file variables.tf
Variables file will hold the potentially dynamic values for our setup, like server size, server OS image name etc.
# Terraform variables referenced by other terraform
# files in this project
#

# token should be exported in the local
# shell environment to avoid hardcoded values
# see readme.md for examples
variable "token" {
  description = "Digital Ocean Api Token"
}

variable "region" {
  description = "Digital Ocean Region"
  default = "lon1"
}
variable "droplet_image" {
  description = "Digital Ocean Droplet Image Name"
  default = "debian-11-x64"
}

variable "droplet_size" {
  description = "Droplet size"
  default = "s-1vcpu-1gb"
}

# location of the private ssh key
# used for ssh connection by terraform
# change the location if different on
# your local machine
variable "pvt_sshkey" {
  description = "Location of the local private ssh key"
  default = "~/.ssh/id_rsa"
}

# ssh_fingerprint should be exported in the local
# shell environment to avoid hardcoded values
# see readme.md for examples
variable "ssh_fingerprint" {
  description = "Fingerprint of the public ssh key stored on Digital Ocean"
}
4. Main Terraform Steps
Next, create the file named main.tf
This file will hold the main steps we want Terraform to run for us in this simple project.
# choose Digital Ocean provider
provider "digitalocean" {
  token = "${var.token}"
}

# create VM instance on Digital Ocean
resource "digitalocean_droplet" "popularowl-server" {
    image = var.droplet_image
    name = "popularowl-server"
    region = var.region
    size = var.droplet_size
    ssh_keys = [
        var.ssh_key_fingerprint
    ]

    # allow Terrform to connect via ssh
    connection {
        host        = self.ipv4_address
        user        = "root"
        type        = "ssh"
        private_key = "${file(var.pvt_sshkey)}"
        timeout     = "2m"
    }

    # run all necessary commands via remote shell
    provisioner "remote-exec" {
        inline = [
            # steps to run in ssh shell
            "apt update"
        ]
    }
}

# print out ip address of created Jenkins server VM
output "service-ip" {
  value = "${digitalocean_droplet.popularowl-server.ipv4_address}"
}
In the above file, we choose to use Terraform provider for Digital Ocean.
This means, that Terraform will automatically connect to the cloud platform by using defined set of its APIs. And will perform all the setup needed.
We then instruct Terraform to create us a resource, which I call popularowl-server.
The properties for this resource are supplied as variable names (remember the variables.tf file we created earlier?)
Notice that we haven't hardcoded var.ssh_key_fingerprint variable in the file?
It is a good practice not to hardcode the sensitive information in the code (which gets checked into version control history).
We will supply this value as environment variable later and Terraform will read it from enviroenment.
We also instruct Terraform to connect to newly created virtual server via ssh and execute specific shell commands. In this step its only apt update.
5. Run the shell steps from file
Even if we can run all the shell instructions via ssh, it makes sense to run shell steps from the separate file.
This gives us more control if the number of such shell steps grows bigger.
Create the directory called files and the new file files/setup.sh
Next, define all the shell commands you want to run. For the purpose of this tutorial they are the following
#!/bin/sh

# setup the new virtual mashine
apt update
echo "All done. Welcome to your new virtual server."
Next we update the main.tf file resource section, with the following provisioners:
provisioner "file" {
    source      = "files/setup.sh"
    destination = "/tmp/setup.sh"
}

...

provisioner "remote-exec" {
    inline = [
        # run setup script
        "chmod 755 /tmp/setup.sh",
        "/tmp/setup.sh"
    ]
}
...
The above commands instruct the Terraform to copy setup.sh file over to the newly create virtual machine. And secure shell will execute this shell script.
6. Print out VM details
We are almost done. Last item we will add to Terraform files is the output of information after all setup is finished.
Add the following to the very bottom of the main.tf
output "service-ip" {
  value = "your new instance is running with IP address: ${digitalocean_droplet.popularowl-server.ipv4_address}"
}
...
6. Export sensitive variables
There are 2 sensitive variables for this project which Terraform will need in order to run the setup steps for us.
First is Digital Ocean access token. This token should be retrieved from the Digital Ocean cloud platform.
Second, is the fingerprint data for the public key we want to upload to the newly created VM so we can connect via ssh. It has to be setup / created on Digital Ocean platform as well.
Once you have both of above, export them as environment variables you local development machine shell. Terraform will read them if the prefix is TF_VAR_
export TF_VAR_token=xxxxxxxxx
export TF_VAR_ssh_key_fingerprint=xxxxxxxxx
7. Create and destroy VMs.
We are now ready to automatically create VMs.
terraform plan
terraform apply
terraform destroy
Run terraform init to setup the project (Terraform will download all dependencies). Run terraform plan to see what resources will Terraform create. Run terraform apply to create and setup resources. Run terraform destroy to destroy all virtual machines in this project.
Summary
We have created a simple, yet very powerful foundation project for automating the setup and configuration of virtual machines.
You can destroy and recreate the setup within minutes. This allows you to manage the cost of cloud resources used. You can always recreate the state of the infrastructure setup.
Full source code of files we created during this tutorial is hosted on GitHub.