Next part of this tutorial: Automating Kong API gateway with Terraform
This post is part of the tutorial series about adopting Kong API gateway product as part of your technology stack.
Kong is an open source API gateway based on the Nginx server and OpenResty low level framework. Both of these underlying open source technologies enable Kong API gateway to be lightweight, to have high transaction throughput and a very low memory footprint.
Kong API gateway as product focuses on GitOps, automation and scalability.
The goal of this tutorial is walk through the process of installing Kong API gateway and build first secure public API.
What will we build?
By the end of this tutorial you will have working Kong API gateway installation with a new service and route for public API. Secured with API key.
Prerequisites
- Access to Debian Linux server. Any virtual server works, you can use VirtualBox on your dev machine. Or any cloud platform which provides temporary VPS. I'm using Digital Ocean in this tutorial - they have generous free credits for all new signups.
- API testing tool of your choice. It can be
curl,httpie, any UI based tool. Here is a list of API testing tools. I'm using Flashpost in this post.
1. Provisioning Virtual Host
For this tutorial, we will use temporarily Debian Linux VM instance on Digital Ocean. It allows to simply create and delete virtual machine droplets for testing and the proof of concept work.
Once we have the new server up and running, we use ssh to connect and prepare it for installing Kong.
Run the following shell commands to get started
# update & install
# required dependencies curl, netstat, etc.
apt-get update
apt-get install -y apt-transport-https curl net-tools

# setup debian firewall
# only allow ports for
# ssh (22)
# kong apis (8000) - as demo setup
apt-get -y install ufw
ufw status verbose
ufw default deny incoming
ufw default allow outgoing
ufw allow ssh
ufw allow 22
ufw allow 8000
yes | ufw enable
2. Install Datastore
Next, we will setup the datastore.
Kong API gateway can run as a stand alone application, without any datastore.
In which case it stores all the configuration and setup in memory amd configuration files. If data store is configured, Kong API gateway persists all the API object configurations and setup there.
For a more robust installation, Kong supports PostgreSQL database engine.
We are going to use PostgreSQL for the purpose of this tutorial. The following will install and prepare DB on your Debian VM
# install & configure postgresql database
# create kong db user & kong database
apt-get install -y postgresql postgresql-contrib

# increase linux open files limit
# this is recommended setting by kong team
ulimit -n 4096

# change to neutral directory
cd /tmp

# create new db, db user with credentials
su - postgres -c "createuser -s kong"
su - postgres -c "createdb kong"
sudo -u postgres psql -c "ALTER USER kong WITH PASSWORD 'kong';"
3. Install Kong api gateway
We will use curl to download Kong API gateway version 3.8.0 debian package. And apt manager to install the package.
# install the Kong API gateway (3.8.0)
# guidelines from: https://docs.konghq.com/gateway/3.8.x/install/linux/debian/?install=oss
curl -Lo kong-3.8.0.deb "https://packages.konghq.com/public/gateway-38/deb/debian/pool/bullseye/main/k/ko/kong_3.8.0/kong_3.8.0_$(dpkg --print-architecture).deb"
sudo apt install -y ./kong-3.8.0.deb
4. Create Kong configuration
Next, before start, we have to create Kong configuration.
Kong API gateway supports file based configuration which is maintained in kong.conf. This file is read once kong start or kong prepare commands are used.
Under the hood, based on this configuration file, Kong generates Nginx configurations and reloads them.
After we installed Kong Debian package in the previous step, the home directory was created at /etc/kong. Navigate there and you'll find it contains the example configuration file.
Copy kong.conf.default to kong.conf
Now, you have to un-comment and edit the lines in the database section. We use the PostgreSQL details we provisioned in the previous step.
# run Kong in standalone mode
# with PostgreSQL db
database = postgres
pg_host = 127.0.0.1
pg_port = 5432
pg_timeout = 5000
pg_user = kong
pg_password = kong
pg_database = kong

# list of exposed interfaces
# admin apis will be only accessible
# from the local host (inside VM)
proxy_listen = 0.0.0.0:8000
admin_listen = 127.0.0.1:8001
5. Start Kong api gateway
We can now bootstrap and start Kong application.
Bootstrap step is needed for Kong to connect to database and migrate the schema. Go to config file directory and run the following
kong migrations bootstrap -c /etc/kong/kong.conf --vNow you can start the Kong API gateway
kong start -c kong.conf --v6. Test Kong Management apis
You Kong API gateway is now running.
It provides a set of management apis to configure and manage API gateway while its running.
Remember, in the config file we set the management APIs to run on 127.0.0.1:8001. This means management APIs are only accessible within Debian VM.
Let's ssh into VM and try few management API requests.
curl localhost:8001/status | jq

{
  "memory": {
    "workers_lua_vms": [
      {
        "http_allocated_gc": "48.24 MiB",
        "pid": 4980
      }
    ]
  },
  "database": {
    "reachable": true
  },
  "server": {
    "connections_writing": 2,
    "connections_waiting": 0,
    "total_requests": 8,
    "connections_active": 2,
    "connections_handled": 8,
    "connections_reading": 0,
    "connections_accepted": 8
  }
}

curl localhost:8001/services | jq

{
    "data": [],
    "next": null
}

curl localhost:8001/routes | jq

{
    "data": [],
    "next": null
}
Status endpoint gives us operational information on the running Kong API gateway. There are no services or routes configured yet.
Next, We will use Kong management APIs to setup our first public API resource and add security plugin.
Note: Kong management APIs are very powerful, and allow full control of the setup. Make sure you do not expose these API endpoints publicly.
8. Create a public API resource
Kong API gateway has the concept of services and routes.
Services define the connection to the underlying backend service. Routes manage the incoming request configurations.
Let's create the first Kong service which forwards incoming API requests to httpbin backend.
curl -XPOST localhost:8001/services \
  --data name=mock_service \
  --data url='https://httpbin.konghq.com' | jq

{
  "port": 443,
  "tls_verify_depth": null,
  "id": "ef1e812a-bd81-45a4-890f-7374a9c661c4",
  "client_certificate": null,
  "path": null,
  "write_timeout": 60000,
  "tags": null,
  "ca_certificates": null,
  "read_timeout": 60000,
  "host": "httpbin.konghq.com",
  "name": "mock_service",
  "enabled": true,
  "retries": 5,
  "updated_at": 1731086515,
  "created_at": 1731086515,
  "protocol": "https",
  "connect_timeout": 60000,
  "tls_verify": null
}
With service created, next, we need to create the route for incoming requests.
curl -XPOST localhost:8001/services/mock_service/routes \
  --data 'paths[]=/mock' \
  --data name=mock_route | jq

{
  "id": "021da5ce-e5a2-4667-a75a-ebee356dc0a7",
  "service": {
    "id": "ef1e812a-bd81-45a4-890f-7374a9c661c4"
  },
  "snis": null,
  "preserve_host": false,
  "tags": null,
  "response_buffering": true,
  "sources": null,
  "headers": null,
  "hosts": null,
  "destinations": null,
  "strip_path": true,
  "methods": null,
  "protocols": [
    "http",
    "https"
  ],
  "name": "mock_route",
  "path_handling": "v0",
  "created_at": 1731086738,
  "updated_at": 1731086738,
  "paths": [
    "/mock"
  ],
  "regex_priority": 0,
  "request_buffering": true,
  "https_redirect_status_code": 426
}
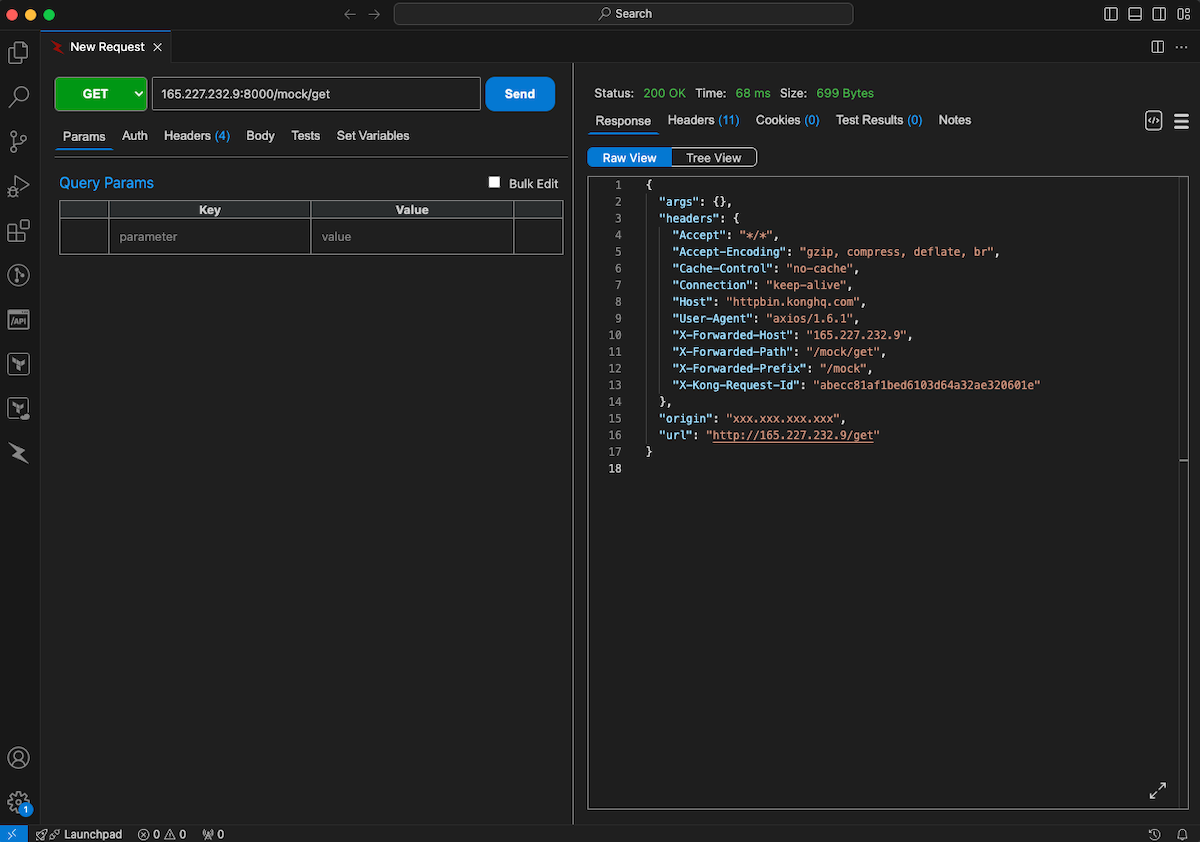
With both service and route successfully created, we can now test our public api on Kong API gateway.
Remember, we configured Kong API gateway to serve public apis externally on port 8000.
I'm using Flashpost as http client. Its a lean VSCode extension which allows APIs testing from your local machine.

Our API is up and running!
9. Add API key security
Last step in this tutorial is to add API key protection for our public api.
Note: it is not the best API security practice to rely on API keys alone. They can be easily extracted from API client applications and abused. Consider OAuth 2.0 or OpenID Connect flows for advanced API security
We cover more advanced Kong public api security topics in other tutorials.
In order to add api key validation, we will use core Kong plugin key-auth.
Enable the plugin for our Kong API gateway
curl -XPOST localhost:8001/services/mock_service/plugins \
  --data name=key-auth | jq

...
"config": {
    "anonymous": null,
    "key_names": [
      "apikey"
    ],
    "key_in_header": true,
    "realm": null,
    "key_in_body": false,
    "key_in_query": true,
    "hide_credentials": false,
    "run_on_preflight": true
 },
...
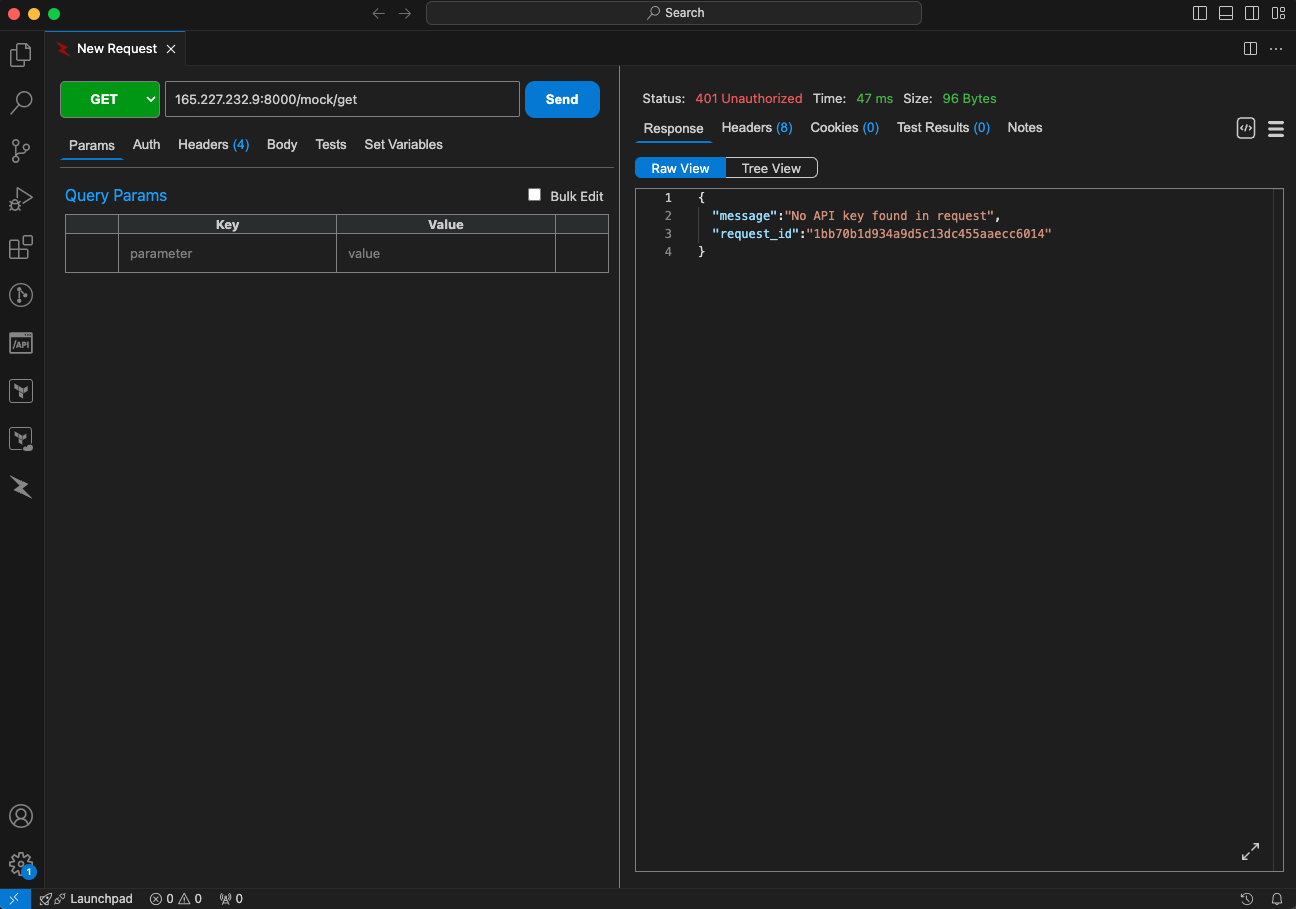
Now, once you repeat the previous request to our public api you should get http 401 response.

10. Create Kong API key
Next, we need to generate a valid API key.
In order to create an API key, we will again use Kong management APIs to create a consumer object. After consumer is created, we will assign test API key to this consumer.
curl -XPOST localhost:8001/consumers/ \
  -H 'Content-Type: application/json' \
  --data '{"username":"popularowl"}' | jq

{
  "created_at": 1731088072,
  "username": "popularowl",
  "tags": null,
  "updated_at": 1731088072,
  "id": "312f4027-6fd3-4f55-9cc7-6ca53f84b9ca",
  "custom_id": null
}

curl -XPOST localhost:8001/consumers/popularowl/key-auth \
  -H 'Content-Type: application/json' \
  --data '{"key":"test1234"}' | jq

{
  "key": "test1234",
  "consumer": {
    "id": "312f4027-6fd3-4f55-9cc7-6ca53f84b9ca"
  },
  "id": "4bc323e5-875a-400d-b7b3-aee0a0dfa69d",
  "ttl": null,
  "created_at": 1731088263,
  "tags": null
}
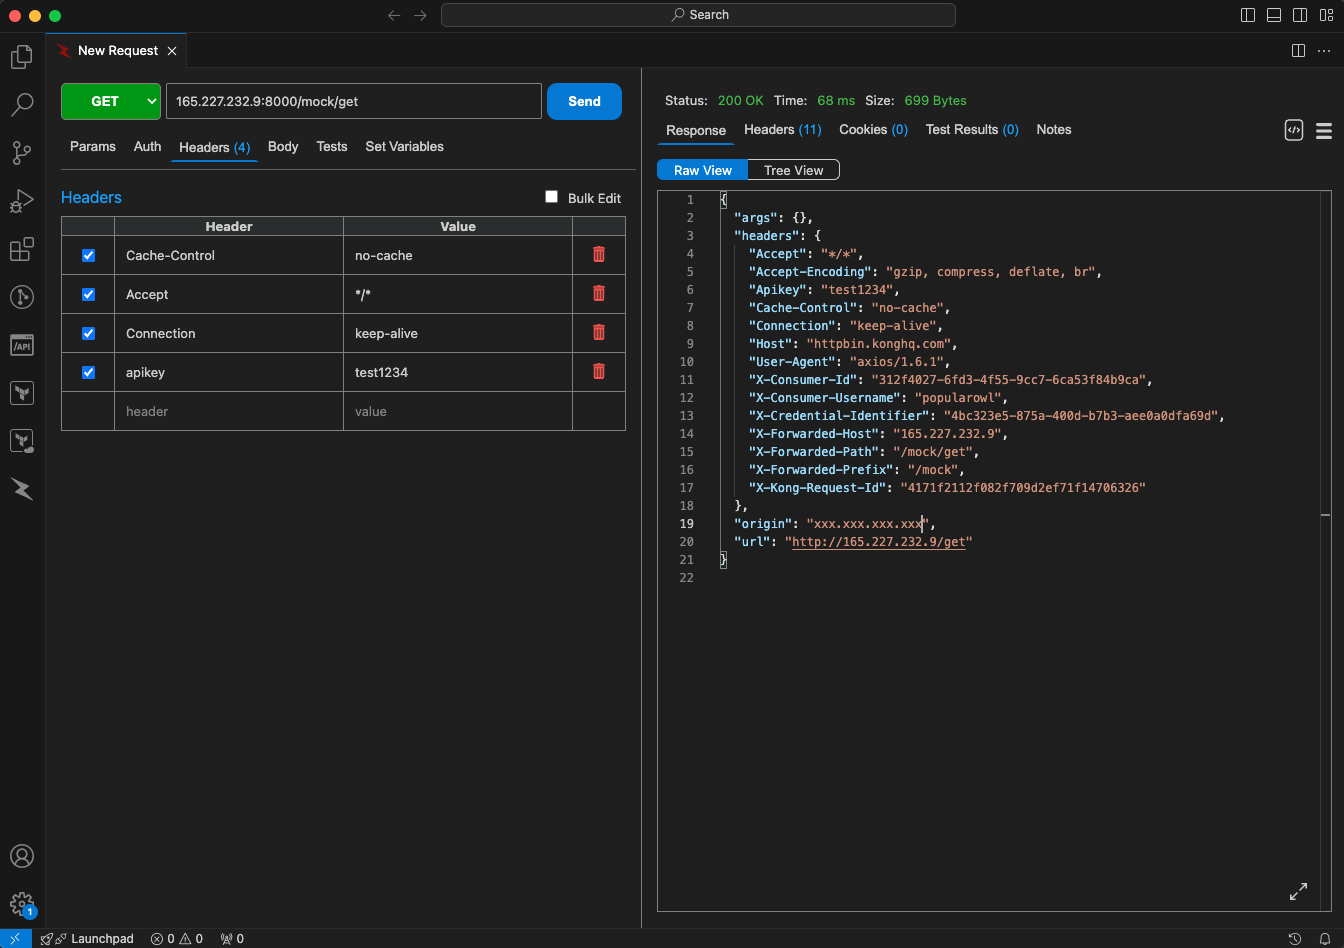
After the consumer and the key are created Kong API gateway by default will allow this consumer key the access to all API resources. Try the API which gave us 401 response code before.
Add apikey header with the value of test1234 (the one which we configured). It should be successful again.

Notice the additional information passed back in the echo API response? Response now contains X-Consumer-Id and X-Consumer-Username values.
Which means Kong API gateway has passed the details of the API key owner to the backend service.
Summary
In this tutorial we have covered the most important steps to get started with using Kong API gateway platform.
Other tutorial parts provide practical examples of automation, advanced API security, custom plugins. Managing multiple APIs for several internal microservices. Monitoring and connecting Kong to UI dashboards.